Monday, April 28, 2008

Momentum Long Tail Article

The Mar/Apr 08 issue of Momentum Magazine has an article about the rise of the long tail bike..=-) Since Momentum provides free PDFs of the whole magazine and posts the text of many articles to their website I figured they wouldn't mind if I posted an image of the article with photos on this blog.

I'd encourage you to check out Momentum on a regular basis. They seem to be one of the few bike magazines in touch with practical non-race oriented cycling. What a refreshing change from the mainstream cycling press.

Chupacabra


Goat - from the Riding the Spine Crew - had a custom long tail bike built that can run super fat 3.7" Surly Endomorph tires. He has put it through some serious thrashing on their ride down through the Americas. Click here to read more about the Chupacabra.


Sunday, April 27, 2008

Doug & Jeremy's Jedi Mind Trick

Doug's Blue Truck

Two cyclopaths whose opinions I value are Jeremy [A.K.A. Jerome!] and Doug. Both these fine riders have blogs and they both have Xtracycle rigs. Doug has had his longest and was the first person who regularly exposed me to his Xtracycle adventures. Doug is a non-nonsense guy that gets his life done without using a car. His fleet of bikes [Pusgely, LHT & Xtracycle rig] is drool worthy...=-) So Doug got me thinking Xtra-licious thoughts, but he lives thousands of miles away so his, normally powerful, Jedi mind tricks were weakened slightly and I was able to resist the sudden urge to buy an Xtra kit.


Jeremy's Christmas Present

Jeremy rec'd an Xtracycle kit from his lovely and thoughtful wife [does she have a sister??...=-)] as a Christmas present this winter. Living so close to me [~90kms] Jeremy was able to more effectively channel his Jedi Master skills and I started to feel the need to get my cargo bike on! Yet I still was able to resist due to the fact I didn't really have a donor bike I wanted to Xtra-fy. The activation energy req'd to purchase an Xtra kit plus a donor bike was just great enough I could fight it off. That of course changed when Surly announced the long awaited Big Dummy was ready for sale.


I can just picture Doug & Jeremy simultaneously waving their hands and softly saying..."...you want a Big Dummy...you will buy a Big Dummy..." At that same moment I reached into my wallet and for my Visa card and called my LBS - Bow Cycle..."...hi...I want a Surly Big Dummy...I'd like to order an 18" frame..."...=-)

Calgary Herald Xtracycle Article

Juergen [Xtracycle Canada - eh!] turned me onto this article in the Calgary Herald. It is nice to see mainstream media giving some attention to cargo bikes.

Saturday, April 26, 2008

Asana Cycles Blog

I've really enjoyed Devian's Asana Cycles Blog. He has some great posts about his Big Dummy and Xtracycle rigs. It seems we share an interest in yoga philosophy and its expression through bicycling. I'll be tuning into his blog to keep up to date on all his cargo bike adventures.

Long Tail Kit + More

What you see in the pic above is the minimum set of Xtracycle accessories I figure you need to get the most out of your Big Dummy/Xtracycle rig. The Long Tail Kit is everything shown above less the wide loaders [red bits] and footsies.

With these items you'll be able to:
  • pick up a passenger
  • carry a week's worth of groceries
  • move a filing cabinet
  • take your TV to the landfill
If you bought a Big Dummy you'll need to budget in at extra $374.00 for everything shown above. If you added an Xtracycle to your bike you'll only need to set aside $139.00 as you get most of the items as part of your $399.00 SUB kit.

My Xtra-goodies are still drying from my stealth painting session, but I'll be putting them to work soon and report back with reviews plus tips on how to get the most from your Xtra-sweet ride.

Vik's Xtra Dumb Painting Tips


I love the army green of my Big Dummy. It sort of reminds of my youth watching MASH. The Xtracycle long tail kit looks good, but its silver and wood accents make me think SoCal skateboarding - not mobile army field hospital...lol...so naturally I had to paint my long tail kit to be more bad ass.!...=-)

Here is what I did:

Supplies:
  • automotive metal primer
  • rubberized automotive undercoating
  • exterior black paint
  • polyurethane
  • solvent

Remove all hardware and put aside.

V-Racks:
  • sand v-racks with coarse sand paper
  • clean with solvent [paint thinner]
  • hang up with coat hanger
  • spray 3-4 coats of primer [allow to dry between]
  • spray 3-4 coats of undercoating [allow to dry between]
  • note: the undercoating takes a long time to dry so don't rush it
Snap Deck:
  • sand snap deck down to wood [coarse sand paper]
  • remove scratches with fine sand paper
  • clean with solvent
  • apply black paint in 5-6 light coats [allow to dry between]
  • apply polyurethane in 5-6 light coats [allow to dry between]
  • once dry buff snap deck with clean cloth and Pledge furniture polish
  • note: for a more durable matte finish follow directions for footsies below

Footsies:
  • paint metal supports as per v-racks above
  • sand footsies down to wood [coarse sand paper]
  • clean with solvent
  • apply 2-3 coats of black paint as primer [allow to dry between]
  • apply 3-4 coats of undercoating [allow to dry between]

The result is a stealth black long tail kit. The finish isn't "classic car show" ready, but this is a work bike so I don't want to cry when I scratch it up. With lots of layers of primer and paint I should be able to keep it looking decent with a touch up spray every few months.

Update: I'm not super happy with the under coat as it wants to come off far more easily than I would have anticipated. I'll run with it through the summer, but when the snow flies I'll strip down the v-racks and get them powder coated or I'll find some more durable paint and do it myself. Other folks have had success with different brands of undercoat so I'd suggest testing some out first before you paint your parts.

Xtracycle Manual

If you didn't get a manual for your Xtracycle or lost it just click here for a PDF.

Update [Aug 2008]: the PDF seems to be unavailable from the Xtracycle website. I have a copy on my laptop so just email me if you need it.

Friday, April 25, 2008

Mugwump Snap Deck Cushions

Clever Cycles is selling these funky and comfortable snap deck cushions for your passenger's riding pleasure. Check out all the cool patterns. $59.95 shipped.

Thursday, April 24, 2008

Pimped out snap deck...

Josh did an amazing job painting his snap deck. It almost looks too good to sit on! I can't wait to see what he does with the rest of his Big Dummy's Xtracycle bits.

Friday, April 18, 2008

Thursday, April 10, 2008

Installing a Disc Rotor on your Rohloff

When you buy your disc brake compatible Rohloff hub it comes sans disc rotor. You'll need to buy a Rohloff specific rotor and install it. See my post below about getting the right Rohloff and accessories for your Big Dummy if you need help determining which rotor to order.

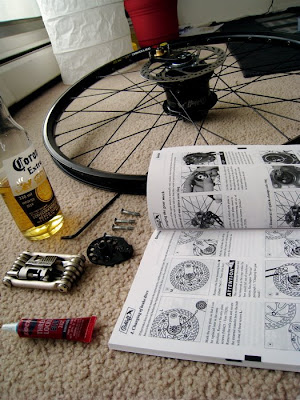
Before you start here is what you'll need:
  • Rohloff hub [disc compatible]
  • Rohloff specific disc rotor [compatible with your brake calipers]
  • Rohloff Owner's Manual [see page 91]
  • Torx 20 driver
  • 5mm allen key
  • 4 disc rotor bolts from the small parts bag that came with your hub
  • blue loctite
  • Icy cold Corona [optional]
First off read page 91 of the owner's manual. Nothing revolutionary here, but it does give you the torque specs and reminds you not to remove the external transfer box.

Remove the Torx head bolts holding the OEM2 axle plate on your hub. There is a small gear underneath the OEM2 axle plate that seems to want to escape. If it does just reinstall it wide side up.

Since you read the owner's manual you won't take the external transfer box off - right?...=-)

Now simply slide the rotor over the external transfer box and line it up with the 4 mounting holes. The owner's manual states you need to be careful to mount the rotor in the right rotational direction. I can't figure out how the caliper would know, but you might as well do what the good folks at Rohloff suggest [see pic below for correct orientation]. Apply some loctite to each rotor bolt and tighten to 7Nm/61in.lbs torque.

Rotor mounted under external transfer box

Now reattach the OEM2 axle plate keeping in mind it needs to be oriented correctly so it engages the torque bolt in your frame and the external gear mechanism points forward so that the gear cables leave it running parallel to the ground. The torx head bolts should be tightened to 3Nm/25 in.lbs and I'd use some loctite here as well.


You are done - reinstall the wheel in your Big Dummy.

Getting the right Rohloff for your Big Dummy

One problem with buying a Rohloff hub is that there are a TON of options to navigate if you want to get the right hub. In this post I'll run through the options to let you know what works and what I chose.

Colour:
  • available in red, black and silver
  • the anodized cases [black and red] should withstand salt and other elements a bit better than the polished aluminum case
  • cases are now laser engraved. If you see one with a sticker on the hub it is older stock.
  • I chose black for the stealth Big Dummy look
Axle:
Internal or External Gear Mechanism:
  • the external gear mechanism is a box that attaches to your hub and your cables terminate there
  • this means you can easily detach it for removing the rear wheel
  • cables are run fully covered to the external gear mechanism so they are immune to the elements
  • it is easier to field service the external gear mechanism
  • the trade off is the shifting is slightly less smooth
  • you cannot use disc brakes with the internal gear mechanism
  • I went with the external gear mechanism for the ease of maintenance and so I could use disc brakes.
Disc Brakes:
  • you will need to use the external gear mechanism
  • you will need to specify disc brake use when ordering your hub
  • you will need a Rohloff specific disc rotor
  • you can use a Rohloff disc hub on a rim brake bike as long as you use a rim with a braking surface
  • I went this route as I wanted to use Avid BB7 disc brakes on my Big Dummy
Torque Support:
  • without any torque support the hub will want to spin and will not drive the bike forward
  • you can get a Rohloff with the following torque support options:
  • you need to be sure you get the OEM2 axle plate
Accessories you'll need:
  • chain tensioner - you'll need this as the Big Dummy has vertical drop outs. Keep in mind there is a standard and DH version. You want the standard version.
  • Tandem length cables - due to the length of the Big Dummy you'll need the longer tandem length cables.
  • Rohloff specific disc rotor - you cannot use the rotor supplied with your brakes as it will have the wrong bolt pattern.
Accessories you may want:
  • chain guide - keeps your chain on the front ring
  • oil change kit - you'll need one of these every 5,000kms so it migt be easiest to buy one or two when you get your hub.
  • Sprockets -all hubs come with a 16T sprocket. You can also get 13T, 15T & 17T sprockets.
Non-Rohloff specific parts you'll need:
  • 38T or larger front chain ring that will fit on the outside of your cranks - same position as big chain ring on a MTB triple. You want a ~54mmm chain line. This chain ring does not need to be pinned and ramped. You'll be able to flip it around and use the other side when it wears out.
  • 2 chains - you'll only use 1 and a bit, but you can save the extra portion and use it dnotw h road. You'll also be able to flip your chain and rear cog around when things start to wear out and get more miles out of your drive train. I bought two 8 speed SRAM chains as they were cheap.
Rohloff Part Numbers

To make your life easier here are the part numbers you can use to ensure you are getting exactly what you need when you order your Rohloff hub:
  • Silver disc brake CC External Gear Mech OEM hub [specify OEM2] - #8025
  • Red disc brake CC External Gear Mech OEM hub [specify OEM2] - #8026
  • Black disc brake CC External Gear Mech OEM hub [specify OEM2] - #8027
  • Axle plate OEM2 [if you forgot to ask for it like I did and got an OEM hub] - #8227
  • Tandem Length cables - #8267
  • Chain Guide - #8290
  • Avid/Shimano 160mm disc rotor - #8281S
  • Hayes 160mm disc rotor - #8281H
  • Magura 160mm disc rotor - #8280
  • Oil Change Kit - #8410
  • 13T Sprocket - #8219
  • 15T Sprocket - #8220
  • 16T Sprocket - #8221
  • 17T Sprocket - #8222

Got Rohloff?

When considering my gearing options for the Big Dummy two paths made the most sense:
  • standard mountain bike gearing [44/32/22 + 11-34 cassette] 16.8" - 104"
  • Rohloff hub [38T x 16T] 17.2" - 90.6"

What is a Rohloff hub?

  • German made internal geared hub
  • 14 equally spaced gears
  • 13.6% change between gears
  • 526% overall gear range
  • on a single bike the smallest chain ring you can use is 38T with a 16T cog on the hub. This is to avoid putting too much torque on the hub.
  • all shifting done by one [2 cable] grip-shift style shifter
  • fully sealed against the elements
  • all the gear changing is done internally so it is not affected by weather or a dirty drive train
  • internals run in an oil bath for smooth efficient operation
  • can be shifted while the bike is stopped
  • service life of 100,000kms
  • weight ~3.7lbs

Standard MTB Gearing

  • free from my spares bin
  • wider gear range
  • easy to get spares
  • known quantity as far as maintenance & performance
  • able to use any standard rear MTB wheel

Rohloff Hub
  • MSRP ~$1500
  • narrower, but equally spaced gears
  • low maintenance
  • good for adverse riding conditions [mud/wet dirt roads]
  • able to shift while stopped
  • no dish in rear wheel = stronger wheel
  • needs proprietary spares
  • unknown performance/maintenance
From an objective analysis of the factors listed above I think the nod has to go to the standard MTB gearing for most uses. The low cost and ease of getting spares makes the benefits of the Rohloff difficult to justify given its high cost.


So why did I get a Rohloff?
  • being an engineer geek there is something magical about the Rohloff that I wanted to experience for myself.
  • I have also read so many Rohloff owners rabidly loyal posts I wanted to see what all the fuss was about.
  • I have been wondering if a Rohloff would make a good choice for an expedition touring bike. On all fronts it seems like a good idea except if you have any mechanical problems with it. Thorn Cycles make numerous Rohloff specific expedition touring bikes and are big fans of the German hub. Given the conflicting information I've read the only way to answer this question is to try one out.
  • They tend to keep a high resale value so if I decided I didn't love my Rohloff I should be able to sell it without taking a tremendous loss.
There is lots more to discuss when it comes to the Rohloff hub in general and how it works on the Big Dummy, but I'll save those topics for future posts.


Here is some recommended reading if you want to learn more:

Xtracycle vs. Panniers Weight Comparison

Rob Byrne sent me this comprehensive weight comparison between using an Xtracycle, rack+panniers & Bob Ibex trailer for touring. He and his wife are planning on hitting the road for a few years of expedition style touring. Interestingly the Xtracycle was the lightest option of the ones Rob was considering for his tour. If you are interested in a Big Dummy add about 1kg or 2.2lbs to Rob's Xtracycle figures above.

Since the loading options of the Xtracycle are quite versatile [you could carry your touring partner and their bike!] you get quite a lot of functionality by using one for a tour without any weight penalty.

Thanks Rob! I'll be looking forward to more informative posts as you continue to prepare for your exciting tour.

Dirt Rag - Big Dummy Review


Dirt Rag has posted a review of the Big Dummy and some Xtracycle accessories on their site.

Josh's Big Dummy

Photo: Josh Maus

Why the Big Dummy:

Originally I considered adding an Xtracycle free radical to a mountain bike but never made it around to doing it. I have a few friends with Xtracycle setups on their bikes and I envied their ability to haul things around-- chairs and coolers to picnics, recyclables to the recycle center, ladders, etc. I have been living car-free for almost a year now and wanted a bike that could bring groceries home, or could be loaded up and go camping with, or be used to transport large items when needed. When I saw pictures of the Big Dummy I decided it was the best route to go.

Build spec:
  • Salsa Pro Moto Bar
  • Salsa stem
  • Swobo grips/bar ends
  • Avid BB7 disc brakes
  • Chris King Nothreadset
  • Shimano Deore XT drivetrain
  • Salsa Delgado Race rims
  • DT Swiss 14 gauge spokes
  • Shimano XT hubs
  • DMR Bikes Transition 26x2.2 tires
  • Salsa seatpost
  • Brooks B17 saddle

I have never had the experience of putting a bike together until the Dummy. I asked Paul McKenna (local bicycle shop owner) for his help with selecting components and assembling it once everything arrived. His help was greatly appreciated! I went with Salsa components because they are associated with QBP (just like Surly) and they make high quality stuff, Swobo just because, Shimano hubs/drivetrain because of the value and quality, Brooks saddle to see what the big deal was about their saddles, Chris King headset because it's a unique project, and DMR tires because they looked good for urban riding.

First impressions:

"Whoa this bike is long!" (but you get used to it after awhile) I really think it rides better when carrying a load, the inertia keeps it rolling with very little effort. Also, the frame feels solid and bullet proof with several years of hard use ahead of it.

Josh's Foosties Review from Powered by Nachos

Wednesday, April 9, 2008

Intalling Planet Bike Cascadia ATB Fenders

I mounted some Planet Bike Cascadia ATB fenders on my Big Dummy recently. They look great and fit the 2" Marathon XRs well.

The rear went on easily without any modifications and fits the BD frame perfectly. The fender struts are touching the BD frame so I'll put some electrical tape there to keep them from rubbing through the paint.

I mounted the front fender to the mid-fork braze ons - avoiding the disc brake caliper entirely. However, PB provides hardware to get you around the caliper if you want to use the lower mounts.

One issue I ran into is the massive amount of clearance in the BD fork means that if you mount the fender to the fork crown as you usually would you end up with a huge gap between the fender and the tire. It looked goofy so I made a small bracket from a scrap of metal to lower the fender closer to the tire.

My Big Dummy


Big Dummy Spec:
  • 18" Surly Big Dummy frame from Bow Cycle
  • front wheel:
    • Mavic XC717 32H rim
    • Shimano XT disc hub
    • Avid 160mm rotor
    • Schwalbe Marathon XR 26 x 2.0" tire
  • rear wheel:
    • Mavic EN325 32H rim
    • Rohloff Speedhub [black, OEM2, disc, external gear box, 16T cog]
    • Rohloff 160mm rotor
  • Avid BB7 mechanical disc brakes
  • Avid 3.0 levers
  • Avid Flack Jacket rear brake cable & housing
  • No name teflon front brake cable and housing
  • Titec H-bar
  • FSA Orbit XL-II headset
  • Nashbar comfort stem
  • Planet Bike Cascadia ATB fenders
  • Race Face LP Turbine cranks [44T soon to be 38T chain ring]
  • Race Face ISIS BB
  • Wellgo BMX platform pedals
  • Rohloff XC chain guide & XC chain tensioner
  • Selle Anatomica saddle
  • Easton seat post [27.2mm]
  • kickstand
  • Planet Bike Superflash LEDs x 2
  • Dinotte Lights 200L-AA
  • Xtra Accessories:
    • v-racks
    • freeloaders
    • snap deck
    • wide loaders
    • tray bien
    • long loader [left]
    • footsies
    • disc caliper protector


Thanks to Surly & Xtracycle


One thing that is for certain - there are easier ways to make money in the bicycle industry than to build a cargo bike. The extra efforts required in the design and manufacturing these bikes is rewarded by a really small market that is almost unknown to the mainstream of cycling. Not exactly ideal if you want to get rich!...=-) Clearly these companies believe in what they are doing and the potential for bicycles to change our world.

I just wanted to say thanks - your efforts are appreciated!

Why the Big Dummy?


When Surly announced that the Big Dummy was going to be hitting the streets in early 2008. I could feel a rush of excitement building that I haven't felt for a bike in a long time. My long standing interest in the Xtracycle concept had finally met the perfect bike at a time in my life when keeping my truck parked as much as possible was a priority.

The Big Dummy caught my eye because the purpose built design looked uber bomber and would mean a bike optimized for use with all the Xtracycle components. In particular I thought the added stiffness would be really important for controlling heavy loads and for traveling over rough terrain. Although many people are happily using Xtracycle Free Radicals on other bikes I could see that having an integrated system that was designed with heavy cargo hauling would be an improvement. That was the Xtra-incentive I needed to jump on the long tail band wagon.

So what are my plans for the Big Dummy? Well first off I'll use it for all the standard cargo missions - groceries, office supplies, hauling bikes, etc... Then I figure I can get a bunch of lifestyle missions accomplished - giving friends a lift, picking up someone on the way to dinner, coffee, etc... Finally I'm really stoked to see how the Big Dummy works for touring. Both on road and off road.

Tuesday, April 1, 2008

Why go Xtra?


My fascination with the Xtracycle began quite a few years ago when I accidentally came across one online. It caught my imagination as an elegant, versatile and practical design. The fact you could attach it to any bike made it accessible to everyone and the variety of loads people were hauling never ceased to amaze me. My cycling interests have gone from performance [road & mtn] to touring and now even more so towards utility cycling. Interestingly my desire and need to drive a car has diminished during the same period.

So didn't I buy an Xtracycle if I thought they were so great? Well there were a number of factors that contributed to this:
  • at first my interest in performance biking kept most of my bike purchases focused on faster and cooler things.
  • I didn't have a donor bike I wanted to Xtra-fy so I would have had to buy one as well as an Xtracycle SUB. That made the purchase cost fairly significant.
  • I have moved a lot and often lived in apartments which did not seem Xtra-friendly.
  • one thing that would have really helped pull the trigger on an Xtracycle never happened - I have never run into one during my travels. I think if I had seen one and been able to try it out I would have seen the light and ordered one.
So what's changed?:
  • my desire to drive my truck is at an all time low.
  • I care far less about how fast my bikes go than how useful they are.
  • I want to tour with my friends who don't have touring setups and who are not as strong cyclists as I am. With an Xtra-fied bike I'll be able to carry all of our gear and they can ride a light bike. Hopefully that will even things out nicely.
  • Surly came out with the Big Dummy!